Drivers
For my Wemos D1 Mini board I didn't have to install any additional drivers, those that came with Arduino IDE worked directly.Drivers for your board:
With esp there is different USB to UART Bridges on different board manuafactures.
CP2102
CH340G or CH340
I have found that they both work ok, but some say that CP2102 is better.
You can see difference if you check chip near usb port.
CP2102 chip is square and CH340G is just rectangle.
You can read more and get drivers from
Link
If you don't yet own ESP you can check this out and get started: Link to eBay
Installing Arduino IDE
Get and install it from this download link.
If you already have it check that you have at least version 1.6.4
Installing ESP library to Arduino IDE
On Arduino IDE go to 'file' menu and select 'preferences'.
From there fill in the 'Additional board managers URL' this url: http://arduino.esp8266.com/stable/package_esp8266com_index.json
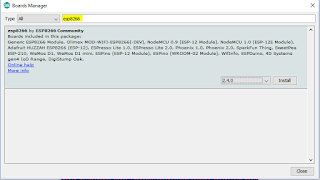
Go to 'Tools' and 'Board Manager..'
From there search "esp8266", and install it.
Now you have new boards in "board" menu.
In my case i select Wemos D1 mini.
Next you have to select correct COM port, and you can also select CPU Frequency and Flash Size, i will talk about these more on following posts. Defaults for these are fine for now.
There is now also new examples, and you should start with basic Blink sketch and see that you can compile and upload it to your board.


No comments:
Post a Comment